How to solve Calcudoku
Calcudoku (also known as KenKen, KenDoku and Mathdoku) was invented in 2004 by Japanese maths teacher Tetsuya Miyamoto as a form of brain training. It first appeared outside Japan in 2008, in The Times.
The examples below use small grids so each step is easy to see, but the same reasoning works on the 9×9 puzzles in our books. Red numbers are candidates (the values a square could still hold). Each example shows the grid before and after the step.
The rules
Fill the grid so that every row and every column contains each number once, from 1 up to the size of the grid. The grid is divided into outlined areas called cages. The small number in the corner of each cage is its target, and the numbers in the cage must reach that target using the cage's operation (+, −, × or ÷).
- + and × give the same answer in any order.
- For − and ÷, start from the largest number: a two-square "3−" cage could be 4 and 1, or 5 and 2.
- Unlike Killer Sudoku, a number can repeat inside a cage, as long as the copies aren't in the same row or column.
- A cage with a single square simply shows its answer.
Some puzzles use only one operation, shown above the grid. Mixed puzzles show the operation in each cage.
Single-square cages
Start by writing in every one-square cage: its target is its answer. Then look at what that does to the row and column around it.
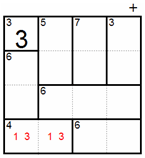
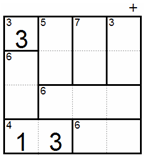
In this 4×4 example, the top-left cage is just "3", so that square is 3. The bottom-left "4" cage covers two squares of the same row, so it must be 1 and 3 (2 and 2 would repeat in the row). Column 1 already has its 3 at the top, so the bottom-left square is 1 and the square beside it is 3.
Cages with only one combination
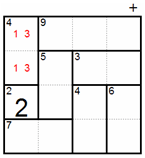
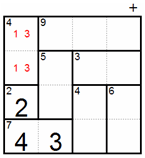
Many two-square cages can only be made one way. In a 4×4 grid, a "4" cage can only be 1 and 3, and a "7" cage can only be 3 and 4. Write the pair in as candidates, then use the rows and columns to decide the order.
Here the "4" cage in column 1 takes 1 and 3, and the "2" square below it is 2. That leaves 4 for the bottom of column 1, so the "7" cage is 4 then 3.
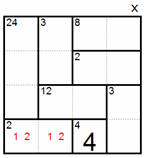
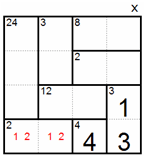
The same works with multiplication. The bottom row's "2×" cage must be 1 and 2, and the single "4" is 4. That leaves 3 for the last square in the row. The "3×" cage going up the right-hand column is then 3 × 1, so the square above it is 1.
Let rows and columns choose
A cage often has two or three possible combinations. Compare them with what's already in the row or column, and the choice usually makes itself.
In this 5×5 example, the "5" cage in the top row could be 1 + 4 or 2 + 3. Column 1 already holds 1, 2 and 3 lower down, so its top square can only be 4, and the cage is 4 and 1.
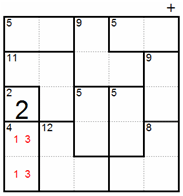
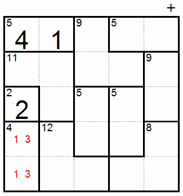
A "6×" cage of three squares along a row can only be 1 × 2 × 3, and a two-square "8×" cage can only be 2 × 4. Here the top row's "6×" cage already uses the row's 2, so the "8×" cage in the right-hand column must have 4 at the top and 2 below.
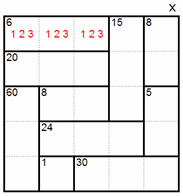
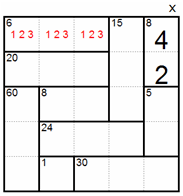
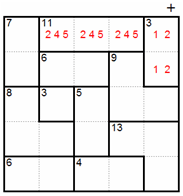
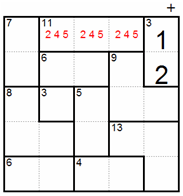
An "11" cage of three squares along a row of a 5×5 grid can only be 2 + 4 + 5 (every other way of making 11 repeats a number or needs a 6). That uses the row's 2, so the "3" cage in the top-right corner must be 1 at the top and 2 below.
Division and multiplication pairs
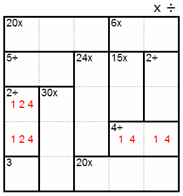
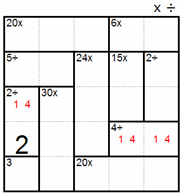
Division cages narrow things quickly because few pairs divide exactly. In a 5×5 grid, "2÷" can be 1 and 2, or 2 and 4. "3÷" can only be 1 and 3, and "4÷" can only be 1 and 4.
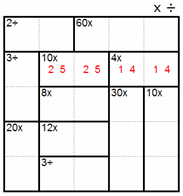
Here row 2 has a "10×" cage (2 and 5) and a "4×" cage (1 and 4, since 2 × 2 would repeat in the row). The only number left for the first square in the row is 3, so the "3÷" cage it belongs to is 3 and 1.
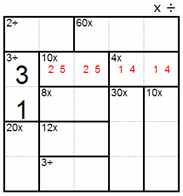
The "2÷" cage in column 1 could hold 1, 2 or 4. Row 4's "4÷" cage already uses that row's 1 and 4, so the "2÷" square in row 4 must be 2.
Cages that are very large or very small
Look at cages whose target is close to the biggest or smallest possible value for their shape. In an L-shaped cage of three squares, the corner shares a row with one end and a column with the other, so it must differ from both. The two ends can be equal.
In a 5×5 grid, a "14" L-shaped cage needs two 5s and a 4. The 5s can't share a row or column, so they go at the ends and the corner is 4.
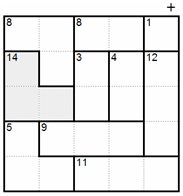
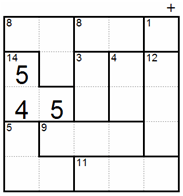
Products work the same way: 80 can only be made as 5 × 4 × 4, so the two 4s go at the ends of the L and the 5 in the corner.
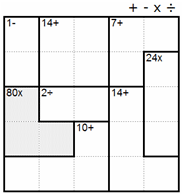
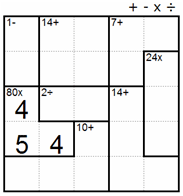
Small targets help too. This "7+" cage has three squares in one column, which must all be different, so they add up to at least 1 + 2 + 3 = 6. That leaves exactly 1 for the fourth square.
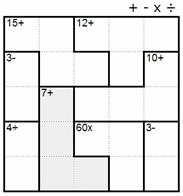
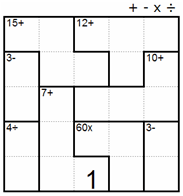
This "32×" cage has three squares in one column. 32 has no factor of 3 or 5, so those three squares must be 1, 2 and 4, which multiply to 8. The fourth square is therefore 32 ÷ 8 = 4.
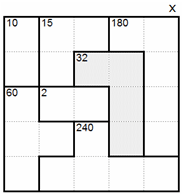
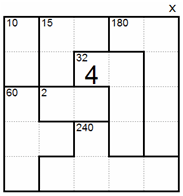
The row and column totals rule
This is the most useful advanced technique. Every row and column contains each number once, so in a 5×5 grid every row and column adds up to 1 + 2 + 3 + 4 + 5 = 15 and multiplies to 1 × 2 × 3 × 4 × 5 = 120. In a 9×9 grid the totals are 45 and 362,880.
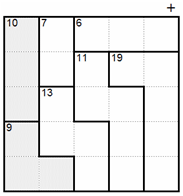
Find a row or column (shaded) that is covered by whole cages except for one square, or by whole cages plus one square that pokes outside it. The difference between the cages and the total gives you that square.
Here row 1 contains the whole "2" cage and the whole "8" cage. That's 10 of the row's 15, so the remaining square is 5.
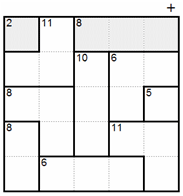
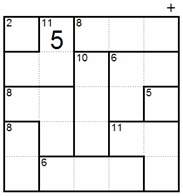
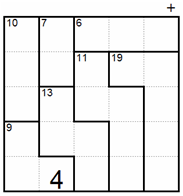
Here the "10" and "9" cages cover all of column 1 plus one extra square. Together they make 19, but column 1 only adds up to 15, so the square poking out is 4.
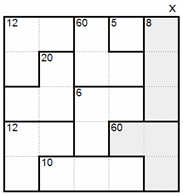
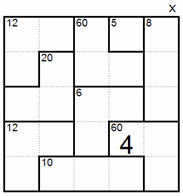
The same works with multiplication. Column 5 must multiply to 120. Its top three squares are the "8×" cage, so the bottom two multiply to 120 ÷ 8 = 15. They belong to the "60×" cage, so its third square, sticking out of the column, is 60 ÷ 15 = 4.
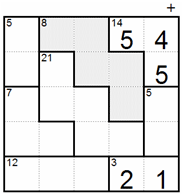
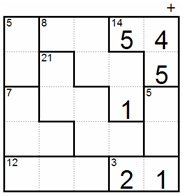
You can also combine two rows or two columns, which together total 30 in a 5×5 grid. Here the shaded cages and the numbers already placed account for rows 1 and 2, apart from one square that pokes down into row 3. The difference shows it must be 1.
Combining cages with totals
The hardest puzzles need you to combine several of these ideas. Work out what the totals rule tells you about part of a cage (dotted squares in these examples), then use the cage's own target and the candidates around it to finish the job.
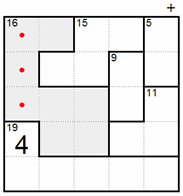
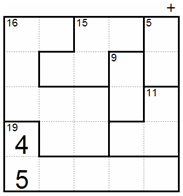
Here the "16" cage covers three squares of column 1 (dotted) plus the shaded squares beside them. Combining column 1's total with the 4 already placed fixes the bottom-left square as 5.
Here the top row is filled apart from the 2 and 5 of the "22" cage. Weighing the "22" and "18" cages against the row totals fixes the 1 and 5 in column 1.
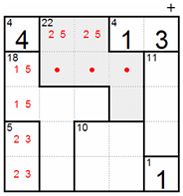
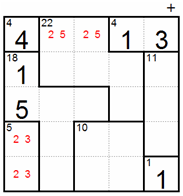
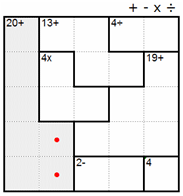
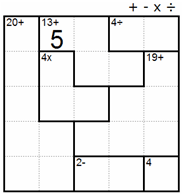
In this mixed-operation puzzle, the "20+" cage covers all of column 1 (which totals 15) plus the two dotted squares, so those two must add up to 5. Following that through places the 5 at the top of column 2.